Datsun B210 or 120Y was a lovely car I used to love as a kid. The need to ride one as a man has been deposited in blood for a long time now. After collecting some cash I looked into the current market to spot one at a good price in a considerably good condition.
Along the semester I have been looking for cars around the Internet classifields and facebook markets and it was very sad to see some of them being sold while I was looking at them. After the exams the immediate Monday I saw a car on facebook which caught the eye and I called a friend to go see her. She was a red beauty with some corrosion and an engine miss. The car had datsun logos and a custom steering wheel. The wiring looked like a mess and the rear left door has been corroded very badly. There were no winder handles and no locks in the trunk and the car had a nice muffler to give it a real muscle touch.
The signal arm was jammed and the dashboard cabin hole was barely holding on and breaks needed attention. You can call it rusty in Cars Movie because it had rust all over.
So after the inspection we took her for a ride and the experience was fun. And we got the car afterwards for a worthy price considering the Sri Lankan Market.
Braking is the most valuable function of the car that keeps us alive. So having it properly checked is always safe. Although the 120y was originally designed to have a brake pump that transfers mechanical energy from the pedal to the wheel cylinder via brake fluid with 4 drum brakes the later models had front disk brakes.
The braking system is a non-servo braking system which demands a bit of muscular strength to push the brake pedals and less ability to quickly respond but these were excellent brakes at the time the car was made.
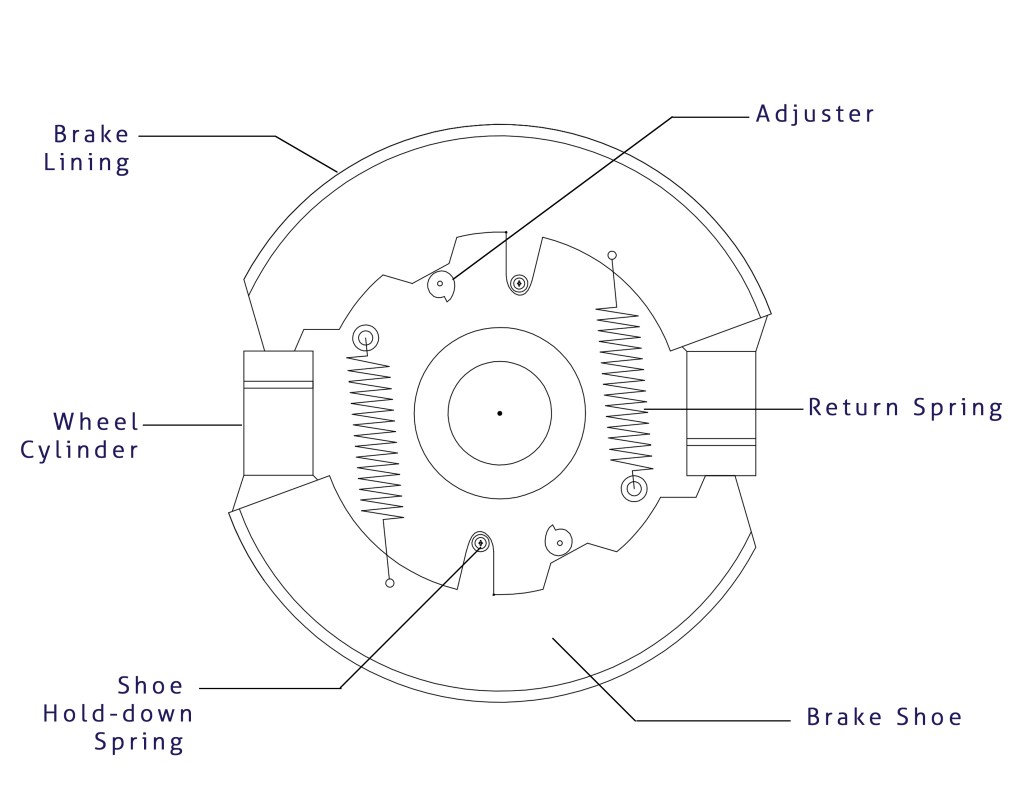
What happens when we press the pedal down is the spring loaded pistons inside the master cylinder moves forward due to the mechanical force applied by the foot and deliver a hydraulic force through the brake line to the pistons inside the wheel cylinders moving the brake shoes toward the brake drum. The friction between the brake drum and the brake lining generates heat from the kinetic energy of the car thus reducing its speed. When we take foot off the pedal the return springs push the brake pedal back to the original position and the volume of brake fluid required to transfer the pushing force returns back to the reservoir and brake lines remain filled ready to be applied again.
Over the time the brake lining grows thin due to wear off. There is a mechanical self adjustment design which 120y lacks and has manual adjustments instead which allows the brake lining to move further forward towards the drum so that the pistons has a little distance to take the lining to the drum.
The 120y has 2 wheel cylinders per wheel which pushes one brake shoe towards the drum. The usual reasons for bad brakes are the wear off of lining, bad brake washers and worn off wheel cylinders in the case of wheels.
After properly lifting the 46 year old car to a height that its wheel can be taken off I removed the brake drum. If the drum is too tight to come out we can loosen the brake shoes from the adjustment nuts behind the wheel. When the drum is removed if the brakes has been working properly the unit should be covered in dust that came out due to wearing of brake lining.
The brake washers hold the brake fluid inside the wheel cylinder to supply the required pressure to the piston. If the washers are worn off or dried off it needs to be replaced. In that case the washers were replaced after checking the condition of wheel cylinders. Then the drum was put back in and the air inside the brake line was removed by bleeding.
A simplified drawing of front drum brakes of the car was drawn and uploaded here.
To take out the washers it was needed to take out brake shoes as they had high tension return springs it was done very carefully.
It was after few rides I noticed that the brake lights were not functioning. I checked it with pressing the pedal and recording the car from behind while doing it and had no luck. But all of the other taillights worked except for the reverse light and brakes. So I started diagnosing from the top.
I pulled the knob to get parking on and wired the brake lights from outside. The brake lights had earth coming from the harness so the holders were not directly contacted to the car body. The lights responded to the +12v I got from the parking pin and that confirmed that the bulbs were okay and the continuity from the tail light box to the wire harness socket was okay.
Then I looked above the brake pedal and found the switch that sends the signal to the lights. It had 2 contacts with one +12v wire clipped to it which sparked as it came in contact with the body mistakenly and yes no need to mount test lamps after that. The other contact is supposed to deliver +12v when the brake pedal is pushed. I mounted the +12v to one side (Upper clip) and mounted the test lamp to the other contact (lower clip). I did it with no prior knowledge to what goes where but with the simple belief that it had to be a simple mechanism to connect the two wires when brakes applied which allows the connections to be reversible. After mounting the free end of the test lamp to the body I pushed the brake pedal and luckily the test lamp was lit. Therefore there was no error in the brake switch.
After the two observations it was obvious that there has to be a continuity problem in the wire harness that runs behind to the tail lamps. So I removed the plastic panels of the right side of the car floor, removed back seats and lifted the velvet clothing to uncover the wiring harness. The wiring harness had been dangerously damaged and it had been rubbed over the car body by the seat and the brake light wire had been broken from the front part of the harness. The wire that goes to the fuel gauge in the dashboard had been completely worn about 7 centimeters off due to the continuous rubbing. The main issue here is that the wire harness lacking proper casing to cover it self properly under the seats and inside the panels.
So I removed the damaged wire parts and replaced them with fresh automobile cables (32/0.20 mm) and soldered them. After treating the damaged wires I covered the harness with insulation tape to prevent damage to a certain extent.
Meanwhile I earthed the fuel Gauge line to see if the fuel gauge works, Luckily it raised halfway up and that was a good sign.
After covering up and soldering the wiring harness was carefully placed to prevent further damage and we have working brake lights.
Being a petrol engine, The datsun heart of 120Y follows the otto cycle. With the firing order of 1-3-4-2 and correct piston being in the right place at the right time and the sparking happens punctually this engine is a smooth and silent one which can have an idle even at 500 rpm.
The engine had a misfire on its way home right after I bought it. And It stopped after 1 or less kilometers with no tendency to start again. The motor was working fine and the fuel smell was coming out of the muffler making the possibility that the ignition system is having a trouble. After inspecting I noticed the distributor rotor had been repaired several times without replacing and it even had a piece of newspaper tucked inside. So we had to replace the rotor in the distributor to get her up.
Being a pure mechanical operated engine the 120y has a manual fuel pump and a mechanical rotor to maintain timing. Afterwards I had to clean the high-tension cable ends to smooth off the run of the engine.
Interior lights add a nice feeling to this 120y. Which lead me to the idea of having 2 lights illuminate the front leg spaces when the lights of the car are on. So I bought 2 12v LEDs Coloured blue to fix them under the steering wheel and cabin.
I discovered a wire that supplies +12v when the lights of the vehicle are on from the wiring harness using a multi-meter and wired it into the 2 lights and they were earthed to the vehicle body at necessary areas. The lights had double sticky tape so they were convenient to place.
A hood light was missing when I bought the car so I purchased a hood light from a local parts store which had LED s and fitted right into the original slots where the nail was supposed to go. A wire carrying +12V was already there so it was just a matter of fixing the wire with + terminal but since the light was a bit oval in shape so it didn’t cover the original hood light space. Light was very bright.
I marked the nails slots on a paper to construct a drawing of what could cover the original hood light space.
The hood light was aligned with nail marks on the paper and the outline was drawn. A circle was drawn centering the hood light and a hole to take the wires out was also marked and the drawn circle was traced on a single DVD box with front shine finish.
The marked circle was taken out by smoothly cutting the circle with a sharp tool for a good finish. I used the divider and turned it until the material along the circumference was removed. It was easy and gave a smooth finish. After cutting the circle the light was aligned and its nail slots and wire positions were marked on the back of the circular plastic piece. Then a hole was cut off for the wires from the marked spot.
A rubber beading was taken from an old grinder basket and was cut to the necessary length and it was stapled from the ends and the staple was drawn over by a black permanent marker to make it invisible. Then paper pins were inserted from the inside of the beading to hold it on the circular plastic base.
After receiving the car I had to see what was fixable under my roof without having to visit a local workshop. From what I noticed at the first inspection before buying this buddy guided a bit in this phase to seek out easy fixes.
I noticed that the cabin hole was barely hanging and I thought of starting with that. I loosened all the screws holding the cabin hole and its plastic bar which holds the cabin hole cover and took the parts out. I noticed that it had pieces of plastic all over and inside the cover.
I collected all the plastic pieces and pasted them on a piece of hard cardboard which was cut to the required shape and completed the puzzle as possible. Afterwards I pasted the piece of cardboard from the inside of the cabin hole cover and it looked better compared to having a hole in the cover.
Classic cars were a part of me growing up as a child. The smell of fuel and motors whining in the morning was what I woke upto living amidst mechanical speedsters and heavy workers. This nostalgia made me buy again the classic models that used to roar in the car shed of my home a long time ago and take care of them like my father did.
These cars need love and care to stay young as they grow old. The insides fade, the body corrodes, the engines grow weaker when the needed care is not given. As a mech undergrad I find myself in a capable position to take care of these cars at my leisure even the process involves some money.
I would like to keep my ongoing projects tagged here as a public diary for anyone to make use of.
What I have demonstrated here might be small fixes and temporary solutions for a specific vehicle. But its more about love and care than engineering. These old classics make me love what I do here and also in the field of automotive engineering as these basic vehicles are the solid layers on which the later car models stand.